Selasa, 26 Oktober 2010

Using new visualizations to tell your story

Spreadsheet data can tell compelling stories when placed into charts and other visualizations. Today we’re excited to announce a new editor for charts, redesigned from the ground up as well as a set of new chart types. Check out our video to see these charts in action:


New and improved chart types
We’ve added annotated time-lines, organizational charts, gauges, our popular motion chart (which makes it easy to visualize data changing over time) and more to our chart types.


We’ve also given our existing charts a more professional look and feel with with a refreshed color palette, improved layout and new customization options.


New charts editor
With these new chart types, we’ve also added a new charts editor that suggests recommended charts, matches your data labels and headers, auto selects colors, has a full size preview pane and more. The editor is designed to help you create the chart you need in just a few clicks.

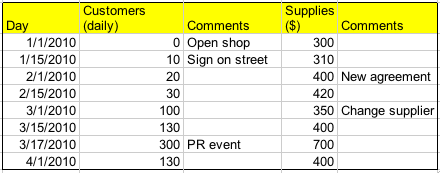
The Start tab has basic options, including up to four recommended charts based on the data you selected. For example, if you have a charts with the following five columns: date, number, text, number, text, the first recommended chart will be an annotated timeline.


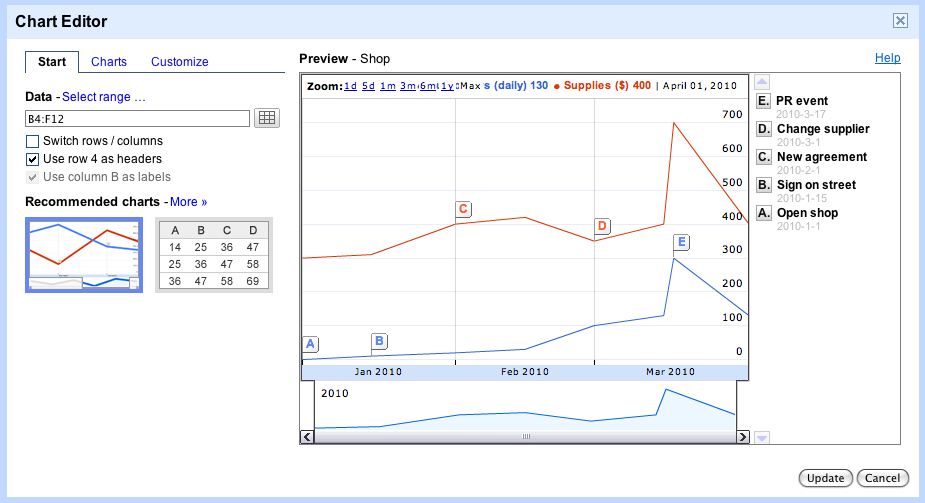
The “Charts” tab includes the full gallery of new and redesigned charts, and the “Customize” tab includes all of the advanced customization options.


Improved publishing
It’s easy to show charts you’ve created in spreadsheets with the world. Publish your interactive chart on any webpage and it will update as you change the data in your spreadsheet. Click the play button below:


Give the new charts editor a try at goo.gl/newcharts, learn more from our help articles and let us know what you think on the forums.

Kamis, 21 Oktober 2010

Google Apps Script support in Google Sites

Google Apps Scripts can save time by sending emails, scheduling calendar events and more with one click.

We just announced on the Google Enterprise Blog that you can now create, edit, and launch Google Apps Scripts from any Google Site. For example, you can create a site to browse and sign up for training sessions. On a training site, you could have a “Register Now” button on each classes page that would automatically add users to the class roster, add the class to their Google Calendar, and email them to confirm enrollment.

To learn more about how to automate tasks in Google Sites using Google Apps Scripts, check out our post on the Google Enterprise Blog.

Selasa, 19 Oktober 2010

Drag and drop images in documents

When writing a document, it often helps to augment text with images and diagrams. Google documents already has three ways to add images: you can choose them from your hard-drive, add them by URL, and you can find them using Google Image Search.

But sometimes the exact image you need is on your desktop and you just want to add it to your document quickly. Starting today, you can drag images from your desktop directly into your documents.


For now, you can use image drag and drop with the latest versions of Google Chrome, Firefox, and Safari. We’ll enable it on other browsers as soon as they support the feature.

Kamis, 14 Oktober 2010

Tips & Tricks: Sharing Google Docs Like a Pro

Google Docs enables you to collaborate on your documents, spreadsheets, presentations, and drawings with as many, or as few, people as you’d like. We’ve explained our new sharing model before, but, in recognition of National Cyber Security Awareness month, we want to make sure you’re aware of your options for sharing your documents.

Google Docs Sharing Icons 101

In your document list, you’ll notice various icons and descriptions listed next to the title of each doc. Here’s a general overview:
  • A lock icon means “Private”
  • A lock icon in front of a globe means “Anyone with the link”
  • A globe means “Public on the web”
Next to each of these icons, you’ll see text indicating who can edit a doc and who can view a doc -- a collaborator is able to edit, while a viewer can access a doc in view-only mode.

Let’s look at a few examples:


If you have a doc with a lock icon that reads “Not shared,” the doc is private to only you. No one but you can find, view or edit that document.

If your doc has a lock icon that reads “[Owner’s name] to X collaborators, Y viewers,” that document is accessible to you and the people with whom you (or a collaborator, if you have given collaborators the ability to change permissions) have explicitly shared it. If the link to the doc is sent to someone who hasn’t been granted either view- or edit-access, that person won’t be able to open the doc.

The sharing setting “Anyone with the link” is represented by a small lock over a globe. If you see this icon, it means that the doc is viewable to anyone who has the link to the doc. You can also explicitly allow certain individuals to edit the document, which is represented by the text “3 collaborators.”

If this link is inadvertently shared with people who shouldn’t have access, you can always reset the link by clicking Reset link in the sharing dialog in your doc:


If your doc is set to public, it will have a globe next to it, and it could potentially be found and viewed by anyone on the web. We call this setting “Public on the web (anyone can view).” If you check the box to allow anyone to edit in the sharing dialog, your doc will also be editable by anyone who opens it.

Be cautious when using this setting to help avoid sharing information beyond your comfort level.

View access versus edit access to a doc
In addition to the indicators above, you can see who can view a doc and who can edit a doc from the sharing dialog within the doc itself. If the doc is set to “Private to X collaborators, Y viewers,” you’ll be able to see which collaborators can view and which collaborators can edit. In the drop-down menu, the owner of the doc, or collaborators who have been granted permission, can change this setting for each person.

Click Change next to the text “Editors will be allowed to add people and change the permissions” if you don’t want to allow people with edit access on your doc to be able to share the document or change the sharing settings.

For docs with the sharing settings ‘Anyone with the link’ or ‘Public on the web,’ the Visibility options pane lets you control whether people viewing the doc will also be able to edit it. Check the box next to “Allow anyone to edit (no sign-in required)” if you’d like anyone who opens your doc to be able to edit it.

Note that both collaborators with view access to a doc and collaborators that have edit access will be able to make a copy of the data or material contained in the doc.

Using this handy reference for sharing icons and settings, we encourage you to go through your document list at docs.google.com and check your document sharing settings to make sure that you’re sharing and collaborating securely in Google Docs. You can learn more about sharing and visibility settings in the Google Docs Help Center.

Selasa, 12 Oktober 2010

Tips & Tricks: Making the most of your sidebar in Google Sites

The sidebar on a Google site helps site visitors find what they are looking for and stays with the user as they navigate the site. Let’s take a look at how you can take advantage of this space.

For example, let’s say you’ve gone on a few trips this summer, and you want to create a site to organize and document your travels. You want each destination linked on the sidebar of your travelogue site.

To access the sidebar menu, go to More actions > Manage site > Site layout (you can also click the Edit sidebar link under your sidebar).

Rearranging order of the links
By default, Google Sites organizes links in alphabetical order, but you can also arrange the pages in the order you visited them.

Click the Edit link within the Navigation box. In the Configure Navigation window, uncheck the box next to ‘Automatically organize my navigation.’ Next, add your pages manually (with the Add page link) and rearrange them with the arrows on the right. The up-down arrows change the order of the pages, and the left-right arrows allow you “indent” a page within another, making it a subpage.


Resizing the sidebar
You can also control the width of the sidebar via Site layout > Change site layout and entering in a new width.

Changing the color of the font
There’s also flexibility when it comes to changing the colors of the text in the sidebar. To find these settings, go to More actions > Manage site > Colors and Fonts.

Adding email addresses or links to other sites
If your travel buddies have their own websites, and you’d like to link to them from yours, you could add external links to your sidebar. Go to Site layout and edit the Navigation box. In the Configure Navigation window, select Add URL and enter in a URL and text to display.


Adding text and images
After you’ve reordered and added external links to your sidebar, you may decide that you’d like to add some information about yourself to your site. Since you can add and format text to the sidebar, as well as insert images and links, it’s easy to create a bio profile. Simply go to Site layout > Add a new sidebar item > Text.


Horizontal navigation
After adding the bio, you notice that the sidebar area got a little crowded. Luckily, there’s a new feature called horizontal navigation that allows you to move your navigation links to across the top of the site.

Go to Site layout > Change site layout and check the box next to Horizontal navigation bar. A new section on the site layout preview will pop up, called “Horizontal navigation bar.” You can customize the horizontal navigation bar the same way you reorganized the links earlier.

Let’s take a look at the result:

The Google Sites team will be adding some new functionality to horizontal navigation soon, so look out for that announcement on this blog.

Senin, 04 Oktober 2010

Online Office Hours with Google Docs

Cross-posted on the Google Student Blog

Guest Post: Alex is a senior at Harvard University, and interned this summer on Google's marketing team. Here he shares how he uses Docs to save time (and body heat) braving the cold Eastern winters

Now that the dorm move-in dust has settled and you have your class schedules all figured out, I wanted to share one of my favorite ways to use Google Docs that might help you stay on top of your work, save some time and maybe even stay a little warmer this school year!

I use the real-time collaboration in Google Docs to hold online office hours with my professors and TAs (teaching assistants). This allows me to collaborate, edit and revise my papers and reports in real-time no matter where my TAs or professors are on campus.

The air is already getting pretty crisp here in Boston and – if your school is in a similarly cold climate – you know exactly how nice it can be to avoid that icy trek across campus to office hours during the winter months. Here is how I use real-time collaboration in Google Docs to hold online office hours with my TAs so that I can review, revise and edit my assignments from the comfort and warmth of my own dorm room:

Set up some time to ‘meet’ with your professor or TA (hint: it's easy to do using Google Calendar). Sign into Google Docs at docs.google.com to get started.

Once in Google Docs, click the 'Share' button in the upper right hand corner. Enter your professor or TA’s email address in the ‘Add people’ field and click ‘Share’.

Your professor or TA will receive a link to the doc and a notification telling them that you have shared your doc with them. When they open the doc you will notice that their user name will appear in the top right corner of the screen. You are now collaborating in Google Docs.

Your professor or TA can now help you revise your doc in real time. Clicking the blue box in the upper right hand corner of the screen will allow you to chat with them and ask questions as you move through the doc. Your editor can also add comments to your doc without actually rewriting the text. Highlighting a passage and then selecting 'Insert > Comment' will allow them to make a note about that section to the right of the page.


Your professor or TA’s cursor will be visible as they move through the doc to show where there are currently reviewing or editing. Their cursor will appear in the color corresponding to the box next to their display name in the chat box. When they highlight a passage you will also be able to see their highlighted section in their color. As more people are invited to collaborate on the doc they will have different colors assigned to them so that you can tell who made each comment or revision.

Holding online office hours with Google Docs is just one of the ways to use Google to simplify your life as a student.