 You can disable keyboard shortcuts on the Sites user setting page. Are there other common actions that you’d like to see added to keyboard shortcuts? Let us know in the comments.
Kamis, 30 September 2010
Keyboard shortcuts in Google Sites
We’re big believers in speed and saving time, which is why we’re happy to announce that we’ve added keyboard shortcuts to common actions like create page and edit page for site collaborators using Google Sites. You can see a full list of keyboard shortcuts here, or simply type Ctrl / (⌘ / on a Mac) to open the shortcut help.
 You can disable keyboard shortcuts on the Sites user setting page. Are there other common actions that you’d like to see added to keyboard shortcuts? Let us know in the comments.
You can disable keyboard shortcuts on the Sites user setting page. Are there other common actions that you’d like to see added to keyboard shortcuts? Let us know in the comments.Selasa, 28 September 2010
More tools for viewing document revisions
We’re happy to announce that a new revision history interface is now available in Google documents. To see it, go to File > See revision history.
In the new revision history interface, you can see what changes were made at a glance.

Click on a time stamp in the right column to see what changes were made at a given time or use the arrow keys to quickly scan through many revisions.

Changes are color-coded based on each collaborator, making it easy to tell what has been added or deleted. For example, in the screenshot below, James (whose edits are highlighted in orange) deleted and added text while bmichael61 (whose edits are highlighted in green) removed a paragraph and added a comment.

Time stamps are also improved in the new interface. We’ve heard requests for time to always be listed, even for very old revisions and we’re listening: you can now tell afternoon edits apart from all-nighters.
The interface also batches revisions into groups of changes to make it easier to understand how a document has changed over time. To see a finer-grained list of revisions, click Show more detailed revisions.

This is just a first step for the new revision interface for Google Docs. We’re looking forward to more revision improvements in the future. Let us know what you think in the comments.
Kamis, 23 September 2010
Import your files many different ways
A spreadsheet without data and numbers in it can get pretty lonely, which is why it’s important to be able to easily import files full of data. Today we’ve improved the import dialogue to give you a full range of options of where to put that data. You can get to the new Import dialog from the File menu.
For example, when importing a .csv file, you can create a whole new spreadsheet, append to the current sheet, add a new sheet to your existing spreadsheet or even replace your entire spreadsheet with this new version.
Now with the new custom delimiters option, you can also specify what character to parse your data file with, giving you maximum flexibility when dealing with your data files.
And finally we spruced up the dialog with a preview pane giving you a first glimpse to see how your imported data will look in your spreadsheet so you can make any changes if necessary.

Happy importing!
PS: If you're using Google Apps for your school or business, join us for a live webinar on Monday September 27th for a review of all the new Google Docs features we launched this quarter.
What’s different about the new Google Docs: Making collaboration fast
This is the final post in a three part series about the collaboration technology in Google Docs. On Tuesday, we explained some of the technical challenges behind real time collaboration. Yesterday, we showed how operational transformation can be used merge editors’ changes.
Imagine that you’re doing a jigsaw puzzle with a bunch of friends and that everyone is working in the same corner of the puzzle. It’s possible to solve a puzzle like this, but it’s hard to keep out of each other’s way and to make sure that when multiple pieces are added at once, that they all fit together perfectly. Making a document collaborative is a little like that: one challenge is coming up with a method to let multiple people edit in the same area without conflicting edits. A second problem is to ensure that when many changes happen at the same time, each change is merged properly with each other changes. In Google Docs, the first problem is handled by operational transformation and the second problem is handled by the collaboration protocol, which is the subject of this post.
To open a Google document, you need code running in two places: your browser and our servers. We call the code that’s running in your browser a client. In the document editor, the client processes all your edits, sends them to the server, and processes other editors’ changes when it receives them from the server.
To collaborate in Google Docs, each client keeps track of four pieces of information:
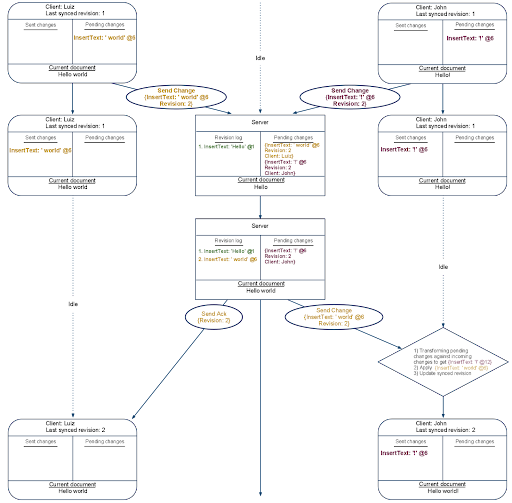
In the diagrams below, the two outer columns represent the editors: Luiz and John. The middle column is the server. The oval shapes represent changes inputted by the editors and sent between the clients and the server. The diamonds represent transformations.
Let’s say Luiz starts by typing the word Hello at the beginning of the document.

Luiz’s client added the edit to his list of pending changes. He then sent the change to the server and moved the change into his list of sent changes.
Luiz continues to type, adding the word world to his document. At the same time, John types an ! in his empty version of the document (remember he has not yet received Luiz’s first change).

Luiz’s {InsertText ' world' @6} change was placed in the pending list and wasn’t sent to the server because we never send more than one pending change at a time. Until Luiz recieves an acknowledgement of his first change, his client will keep all new changes in the pending list. Also notice that the server stored Luiz’s first change in its revision log. Next, the server will send John a message containing Luiz’s first change and it will send Luiz a message acknowledging that it has processed that first change.

John received Luiz’s edit from the server and used operational transformation (OT) to transform it against his pending {InsertText '!' @1} change. The result of the transformation was to shift the location of John’s pending change by 5 to make room at the beginning of the document for Luiz’s Hello. Notice that both Luiz and John updated their last synced revision numbers to 1 when they received the messages from the server. Lastly, when Luiz received the acknowledgement of his first change, he removed that first change from the list of sent changes.
Next, both Luiz and John are going to send their unsent changes to the server.
The server got Luiz’s change before John’s so it processed that change first. An acknowledgement of the change was sent to Luiz. The change itself was sent to John, where his client transformed it against his still pending {InsertText '!' @1} change.
What comes next is important. The server received John’s pending change, a change that John believes should be Revision 2. But the server has already committed a Revision 2 to the revision log. The server will use OT to transform John’s change so that it can be stored as Revision 3.

The first thing the server did, was to transform John’s sent change against all the changes that have been committed since the last time John synced with the server. In this case, it transformed John’s change against Luiz’s {InsertText ' world' @6}. The result shifted the index of John’s change over by 6. This shift is identical to the transformation John’s client made when it first received Luiz’s {InsertText 'Hello' @1}.
The example above ends with Luiz and John receiving John’s change and the acknowledgement of that change respectively. At this point the server and both editors are looking at the same document — Hello world!.
The main advantages of this collaboration protocol are:
Well that’s all folks: we hope by reading this series you learned a bit more about what’s under the hood in Google Docs, and the kinds of things you need to think about to make a fast collaboration experience. You can try collaboration yourself, without signing in, by visiting the Google Docs demo.
Imagine that you’re doing a jigsaw puzzle with a bunch of friends and that everyone is working in the same corner of the puzzle. It’s possible to solve a puzzle like this, but it’s hard to keep out of each other’s way and to make sure that when multiple pieces are added at once, that they all fit together perfectly. Making a document collaborative is a little like that: one challenge is coming up with a method to let multiple people edit in the same area without conflicting edits. A second problem is to ensure that when many changes happen at the same time, each change is merged properly with each other changes. In Google Docs, the first problem is handled by operational transformation and the second problem is handled by the collaboration protocol, which is the subject of this post.
To open a Google document, you need code running in two places: your browser and our servers. We call the code that’s running in your browser a client. In the document editor, the client processes all your edits, sends them to the server, and processes other editors’ changes when it receives them from the server.
To collaborate in Google Docs, each client keeps track of four pieces of information:
- The number of the most recent revision sent from the server to the client.
- Any changes that have been made locally and not yet sent to the server.
- Any changes that have been made locally, sent to the server, but not yet acknowledged by the server.
- The current state of the document as seen by that particular editor.
- The list of all changes that it has received but not yet processed.
- The complete history of all processed changes (called the revision log)./li>
- The current state of the document as of the last processed change./li>
In the diagrams below, the two outer columns represent the editors: Luiz and John. The middle column is the server. The oval shapes represent changes inputted by the editors and sent between the clients and the server. The diamonds represent transformations.
Let’s say Luiz starts by typing the word Hello at the beginning of the document.

Luiz’s client added the edit to his list of pending changes. He then sent the change to the server and moved the change into his list of sent changes.
Luiz continues to type, adding the word world to his document. At the same time, John types an ! in his empty version of the document (remember he has not yet received Luiz’s first change).

Luiz’s {InsertText ' world' @6} change was placed in the pending list and wasn’t sent to the server because we never send more than one pending change at a time. Until Luiz recieves an acknowledgement of his first change, his client will keep all new changes in the pending list. Also notice that the server stored Luiz’s first change in its revision log. Next, the server will send John a message containing Luiz’s first change and it will send Luiz a message acknowledging that it has processed that first change.

John received Luiz’s edit from the server and used operational transformation (OT) to transform it against his pending {InsertText '!' @1} change. The result of the transformation was to shift the location of John’s pending change by 5 to make room at the beginning of the document for Luiz’s Hello. Notice that both Luiz and John updated their last synced revision numbers to 1 when they received the messages from the server. Lastly, when Luiz received the acknowledgement of his first change, he removed that first change from the list of sent changes.
Next, both Luiz and John are going to send their unsent changes to the server.

The server got Luiz’s change before John’s so it processed that change first. An acknowledgement of the change was sent to Luiz. The change itself was sent to John, where his client transformed it against his still pending {InsertText '!' @1} change.
What comes next is important. The server received John’s pending change, a change that John believes should be Revision 2. But the server has already committed a Revision 2 to the revision log. The server will use OT to transform John’s change so that it can be stored as Revision 3.

The first thing the server did, was to transform John’s sent change against all the changes that have been committed since the last time John synced with the server. In this case, it transformed John’s change against Luiz’s {InsertText ' world' @6}. The result shifted the index of John’s change over by 6. This shift is identical to the transformation John’s client made when it first received Luiz’s {InsertText 'Hello' @1}.
The example above ends with Luiz and John receiving John’s change and the acknowledgement of that change respectively. At this point the server and both editors are looking at the same document — Hello world!.
The main advantages of this collaboration protocol are:
- Collaboration is fast. At all times, every editor can optimistically apply their own changes locally without waiting for the server to acknowledge those changes. This means that the speed or reliability of your network connection doesn’t influence how fast you can type.
- Collaboration is accurate. There is always enough information for each client to merge collaborators’ changes in the same deterministic way.
- Collaboration is efficient. The information that is sent over the network is always the bare minimum needed to describe what changed.
- Collaboration complexity is constant. The server does not need to know anything about the state of each client. Therefore, the complexity of processing changes does not increase as you add more editors.
- Collaboration is distributed. Only the server needs to be aware of the document’s history and only the clients need to be aware of uncommitted changes. This division spreads the workload required to support real time collaboration between all the parties involved.
Well that’s all folks: we hope by reading this series you learned a bit more about what’s under the hood in Google Docs, and the kinds of things you need to think about to make a fast collaboration experience. You can try collaboration yourself, without signing in, by visiting the Google Docs demo.
Rabu, 22 September 2010
What’s different about the new Google Docs: Conflict resolution
Editor’s note: This is the second in a series of three posts about the collaboration technology in Google Docs. Yesterday, we explained some of the technical challenges behind real time collaboration.
Think of the history of a document as a series of changes. In Google documents, all edits boil down to three basic types of changes: inserting text, deleting text, and applying styles to a range of text. We save your document as a revision log consisting of a list of these changes. When someone edits a document, they’re not modifying the underlying characters that represents the document. Instead they are appending their change to the end of the revision log. To display a document, we replay the revision log from the beginning.
To see what these changes look like, suppose that a document edited by John and Luiz initially reads; EASY AS 123. If John (represented by green) changes the document to EASY AS ABC, then he is making four changes:

Collaboration is not quite as simple as sending these changes to the other editors because people get out of sync. Suppose as John is typing, Luiz (represented by yellow) begins to change his document to IT'S EASY AS 123. He first inserts the I and the T at the beginning of the document:

Suppose Luiz naively applies John’s first change {DeleteText @9-11}:

He deleted the wrong characters! Luiz had two characters at the beginning of the doc that John was never aware of. So the location of John’s change was wrong relative to Luiz’s version of the document. To avoid this problem, Luiz must transform John’s changes and make them relative to his local document. In this case, when Luiz receives changes from John he needs to know to shift the changes over by two characters to adjust for the IT that Luiz added. Once he does this transformation and applies John’s first change, he gets:

Much better. The algorithm that we use to handle these shifts is called operational transformation (OT). If OT is implemented correctly, it guarantees that once all editors have received all changes, everyone will be looking at the same version of the document.
The OT logic in documents must handle all of the different ways that InsertText, DeleteText, and ApplyStyle changes can be paired and transformed against each other. The example above showed DeleteText being transformed against InsertText. To get a feel for how this works, here are a couple more examples of simple transformations:
- Style ranges expand when they are transformed against text insertions: {ApplyStyle bold @10-20} transformed against {InsertText 'ABC' @15} results in {ApplyStyle Bold @10-23}.
- Sometimes changes don’t conflict and there’s no need to transform anything. For example when a style change is transformed against a different type of style change, there is no conflict: {ApplyStyle italic @10-20} transformed against {ApplyStyle font-color=red @0-30} results in the same {ApplyStyle italic @10-20} because the range of text can be both red and italic simultaneously.
Selasa, 21 September 2010
A more fontastic Google Docs
Cross posted on the Official Google Blog
Documents without font choices are like photographs without colors. Just as shades of color can add depth to a picture, smart font choices give your text another dimension.
For a long time, the set of fonts that you’ve seen when you browsed the web has been quite limited. That’s because you could only use a font that’s already been installed on your computer. So if a website designer wanted all her visitors to see the same thing, she could only use fonts that are so ubiquitous that the chances are very high that every computer will have them. And there are only a handful of fonts that fit that bill.
Thankfully, that situation is changing. All modern browsers now support the ability to download web fonts. A web font doesn’t need to be installed on your local computer—it can be read directly from a web server and used immediately on the webpage that you’re loading. In May, we launched the Google Font API, which makes it easy for website developers to include any one of an ever-growing list of web fonts on their pages. We’re already using the new API for the latest themes in Google forms.
As of today, Google documents supports web fonts (using the Google Font API) and we’re excited to announce six new fonts.
Droid Serif and Droid Sans
Android fans will already be familiar with the Droid family of fonts. Droid Serif and Droid Sans both feature strong vertical lines and a neutral, yet friendly appearance. They’re designed specifically for reading on small screens.

Calibri and Cambria
Every day we have many people import documents from Microsoft Word into Google Docs. Today we’re making import fidelity better by adding two of the most popular Microsoft Word fonts. Calibri is a beautiful sans serif font characterized by curves and soft edges. It’s designed to be high impact. Cambria is built with strong vertical serifs and subtle horizontal ones. It’s very legible when printed at small sizes.

Consolas and Corsiva
Consolas joins Courier New as the second monospaced font in Google Docs. It’s a modern monospaced font with character proportions that are similar to normal text. Finally, Corsiva is our first italic font with embellished characters and an elegant style.

Right now our font support covers most Latin and Western European character sets. However, we’ll be adding web fonts for other languages (like Hebrew and Greek) soon. If you don’t see the new fonts in your documents, check that web fonts are supported in your language and that the document language is set correctly from the File -> Language menu.

This is just the beginning of fonts in Google Docs. We added six new fonts today and we’re already testing our next batch. You’ll see many more new fonts over the next few months. And because Google Docs uses web fonts, you’ll never need to install a new font: when you load your document, the latest set of fonts will always be there, ready to use.
Finally, adding web fonts is just one of the challenges that we have been working on. If you’re interested in learning more about the challenges of building a collaborative application, check out the first post of a three-part series on collaboration posted earlier today.
What’s different about the new Google Docs: Working together, even apart
Editor’s Note: In May, we walked through some technical details about what’s different in the new Google Docs. Beginning today, we’ll dive into the collaboration technology behind Google Docs in three parts, starting with a look at the challenges encountered when building a collaborative application. Tomorrow’s post will describe how Google Docs uses an algorithm called operational transformation to merge edits in real time. Finally, on Thursday, we’ll dive into the collaboration protocol for sending changes between the editors.
The way people work is changing. Ten years ago, it was too hard to co-author a document, so things took longer, or people just put up with less collaboration. But as our communication tools have become better, it’s become more common to have a group of people writing a doc collaboratively.
Collaboration is technically difficult because many people can be making changes to the same content at almost the same time. Since connection speeds aren’t instantaneous, when you make a change, you’re temporarily creating a local version of the document that is different from the versions other collaborators see. The core implementation challenge is to make sure that all the editing sessions eventually converge on the same, correct, version of the document.
One approach taken by the old Google documents and by many other collaborative word processors is to compare document versions. Suppose there are two editors: John and Luiz. In the old Google Docs, the server begins with one version of a document and receives an updated version from John. The server finds the differences between its version and John’s version and decides out how to merge those two versions as best it can. Then the server sends this merged version to Luiz. If Luiz has changes that have not yet been sent to the server, then he needs to compare the server version with his local version and merge the two versions together. Then Luiz sends this merged local version to the server and the process continues.
But often, this approach doesn’t work well. Take the example below. John, Luiz and the server start with the text The quick brown fox. John bolds the words brown fox. As he’s doing this, Luiz highlights the word fox and replaces it with the word dog. Suppose John’s changes arrive at the server first, and then the server sends those changes to Luiz.

The correct way to merge John’s style change and Luiz’s text substitution is as The quick brown dog. But Luiz doesn’t have enough information to know what the correct merge is. From his perspective, The quick brown fox dog, The quick brown dog, The quick brown dog fox are all perfectly valid ways of merging the two versions. And that’s the problem: if you just compare versions, you can’t make sure that changes are merged in the way that an editor would expect.
You can avoid the merging problem by introducing more restrictions on the editors. For example, you could lock paragraphs so that only one editor was ever allowed to type in a single paragraph at a given time. But locking paragraphs isn’t a great solution: you’re sidestepping the technical challenges by hampering the collaborative editing experience. Plus, it’s always possible for two editors to begin editing a paragraph at the same time. In that case, one of the editors will find out that he didn’t actually acquire the paragraph lock and any changes that he made while he thought he had the lock will need to be merged (which has all of the above problems) or discarded.
The new version of Google documents does things differently. In the new editor, a document is stored as a series of chronological changes. A change might be something like {InsertText 'T' @10}. That particular change was to insert the letter T at the 10th position in the document. A fundamental difference between the new editor and the old one is that instead of computing the changes by comparing document versions, we now compute the versions by playing forward the history of changes.
This approach creates a better collaboration experience, because the editors’ intentions are never ambiguous. Since we know the revision of each change, we can check what the editor saw when he made that change and we can figure out how to correctly merge that change with any changes that were made since then.
That’s it for today. Tomorrow’s post will give an overview of the algorithm for merging changes — operational transformation. Even if we know how to properly merge changes, we still need to make sure that each editor knows when there are changes that need to be merged. This challenge is handled by the collaboration protocol which will be the subject of Thursday’s post. Together, these technologies create the character-by-character collaboration in Google Docs.
Kamis, 16 September 2010
Print your spreadsheets (and save ink) with more printing options
With the power of the cloud, you have access to and can share your files from basically any device without needing to print out anything. We understand that there are occasions when you still need to print, however, and that’s why today we’re happy to announce two new features for printing: selection printing and gridless printing. These two new options allow you to not only customize your printouts, but also save ink in the process.
With selection printing you can print a highlighted section from your spreadsheet. The new option to not print the default gridlines is valuable if you’re trying to print a handout or trying to save ink. You can access these settings via File > Print.

These printing improvements are a direct result of feedback from many of you. If you have more ideas, let us know in the forums.
Jumat, 10 September 2010
Back to School with Google forms
Cross posted on the Google Student Blog
Guest Post: Emily is a senior at Emory University, majoring in Business and Biology. This summer, she worked as an intern on the Google Apps for Education team and here she shares her thoughts on using Google forms on campus.
During the hectic first few weeks back at school – which can be the busiest time of year for a college student – one of the things that helps me get things done and stay organized is Google forms. I started using this functionality a lot during my summer internship to survey the intern community and other groups across the company. It’s an easy and efficient way to obtain and interpret information from many people and that’s why I’m excited to use it now that I’m back at school.
Google forms allows me to quickly create a survey with various information gathering formats (multiple choice, free answer, check box, and more). Then I can simply send a link for the published form to the desired respondents and their answers automatically feed into a spreadsheet in Google Docs.
For example, I recently used Google forms for a club I’m involved in called Goizueta International Network, an organization that helps incoming and outgoing exchange students make the most of their abroad experiences. Google forms allowed me to survey the international exchange students about what activities they would be interested in for the upcoming year.
All the international students are from different countries and live all across campus, so creating a survey using Forms was a convenient and universally understandable way to get information. Plus I was able to spice up the appearance of the survey with a new Google form theme.

After collecting all of the responses, I could easily view the results of my data. All I had to do was go to the “Form” tab in the spreadsheet housing all of the survey information and select “Show summary of responses.” This produced the data in a simple, clear graphical format making the data easy to use.
Check out the responses to the question “I am interested in the Goizueta International Network organizing the following...”

We’ve decided to focus on the ideas that had the most support. We know they will benefit and excite both local and foreign students because they all participated in the decision process.
Google forms can be useful in any area of a college student’s life. It can classify and coordinate information for classes, clubs, athletic teams, fraternities or sororities, friends, family, or any group or organization. As a Google Student Ambassador I plan to educate more people on my campus about how Google forms (along with the rest of the Docs and Apps suite) can make all their activities run more quickly and easily.
Without putting in too much effort, we got a solid response rate and now have some great ideas for next year.
Rabu, 08 September 2010
Learn about Google Docs
Google Docs is more than just creating online documents, spreadsheets and presentations. With Google Docs, you can access your files from anywhere, share them with the people you choose, and work together in real time.
To help those of you just getting started with Google Docs we have created a new series of videos. These videos give a high level overview and steps to get started. And since each video is focused on one feature, its easy to only learn about the ones that matter most to you:
Document list
Sharing
Collaboration
Documents
Spreadsheets
Presentations
Forms
Drawings
In addition, we just launched our own YouTube channel at youtube.com/docs. You can view all of the videos above in the custom video gadget at the top of the channel, which will help you keep track of which videos you've already watched.
 If you’re just getting started, we hope these videos help you discover more about Google Docs. And if you’re a Google Docs expert, you might enjoy sharing some of these videos with a friend.
To help those of you just getting started with Google Docs we have created a new series of videos. These videos give a high level overview and steps to get started. And since each video is focused on one feature, its easy to only learn about the ones that matter most to you:
Document list
Sharing
Collaboration
Documents
Spreadsheets
Presentations
Forms
Drawings
In addition, we just launched our own YouTube channel at youtube.com/docs. You can view all of the videos above in the custom video gadget at the top of the channel, which will help you keep track of which videos you've already watched.
If you’re just getting started, we hope these videos help you discover more about Google Docs. And if you’re a Google Docs expert, you might enjoy sharing some of these videos with a friend.Selasa, 07 September 2010
Easier site organization with drag and drop
Page organization is an important part of using Google Sites, especially when you want to make a lot of changes to your Site’s structure. To make it easier and save you time, we just enabled drag and drop functionality in the Pages area of site management. Site owners and collaborators can try it out on via Manage site > Pages in the tree view.
 We hope you like this little time-saver.
 We hope you like this little time-saver.
Jumat, 03 September 2010
Trimming our privacy policies
Cross posted on the Gmail Blog and the Official Google Blog
Long, complicated and lawyerly—that's what most people think about privacy policies, and for good reason. Even taking into account that they’re legal documents, most privacy policies are still too hard to understand.
So we’re simplifying and updating Google’s privacy policies. To be clear, we aren’t changing any of our privacy practices; we want to make our policies more transparent and understandable. As a first step, we’re making two types of improvements:
Our updated privacy policies still might not be your top choice for beach reading (I am, after all, still a lawyer), but hopefully you’ll find the improvements to be a step in the right direction.
Long, complicated and lawyerly—that's what most people think about privacy policies, and for good reason. Even taking into account that they’re legal documents, most privacy policies are still too hard to understand.
So we’re simplifying and updating Google’s privacy policies. To be clear, we aren’t changing any of our privacy practices; we want to make our policies more transparent and understandable. As a first step, we’re making two types of improvements:
- Most of our products and services are covered by our main Google Privacy Policy. Some, however, also have their own supplementary individual policies. Since there is a lot of repetition, we are deleting 12 of these product-specific policies. These changes are also in line with the way information is used between certain products—for example, since contacts are shared between services like Gmail, Talk, Calendar and Docs, it makes sense for those services to be governed by one privacy policy as well.
- We’re also simplifying our main Google Privacy Policy to make it more user-friendly by cutting down the parts that are redundant and rewriting the more legalistic bits so people can understand them more easily. For example, we’re deleting a sentence that reads, “The affiliated sites through which our services are offered may have different privacy practices and we encourage you to read their privacy policies,” since it seems obvious that sites not owned by Google might have their own privacy policies.
- More content to some of our product Help Centers so people will be able to find information about protecting their privacy more easily; and
- A new privacy tools page to the Google Privacy Center. This will mean that our most popular privacy tools are now all in one place.
Our updated privacy policies still might not be your top choice for beach reading (I am, after all, still a lawyer), but hopefully you’ll find the improvements to be a step in the right direction.
Kamis, 02 September 2010
Drawing out ideas in documents
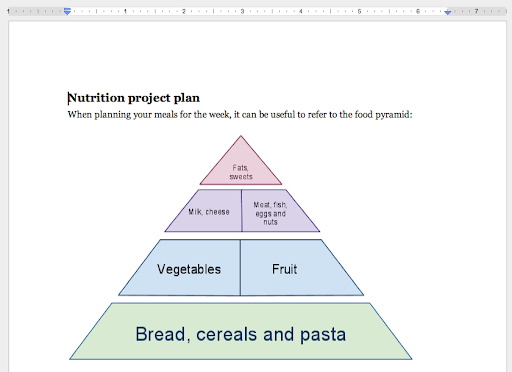
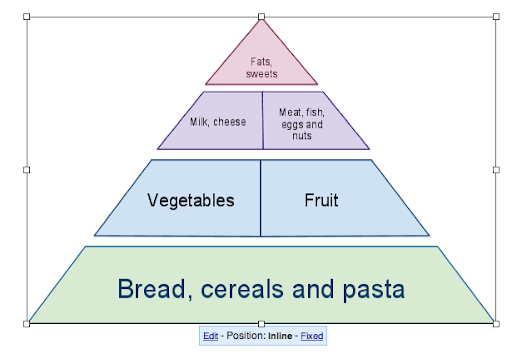
Have you recently toiled over instructions to assemble furniture? Now imagine the agony if you had no illustrations to fall back on. What’s the best way to teach kids about nutrition without a food pyramid?
Sometimes when working with text you realize that words can only articulate so much. And that’s why we have drawings in Google documents. Drawings can be useful for things like diagramming processes in a flowchart or clearly articulating the relationship between a groups of ideas.
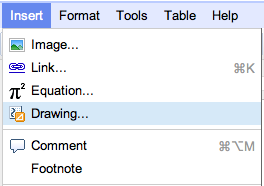
To get started, select the Drawing option from the Insert menu:
Now, you’ll see the drawing editor.

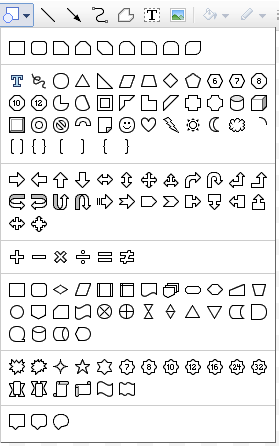
When creating a drawing for a document, the shapes menu can be particularly helpful. From thought bubbles to arrows to a smiley-face, this menu can help you whip up something playful or professional in no time.
As with images, you can resize a drawing and even mark it as inline or fixed within your document.
 You can also copy an existing Google drawing into a document. To do that, first select the relevant shapes in your original drawing, and then copy them using the Web clipboard.
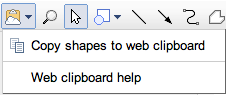
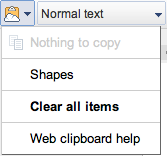
In your document, open the Web clipboard and paste the drawing into your document.
Give it a test drive and let us know what you think in the comments.
Sometimes when working with text you realize that words can only articulate so much. And that’s why we have drawings in Google documents. Drawings can be useful for things like diagramming processes in a flowchart or clearly articulating the relationship between a groups of ideas.

To get started, select the Drawing option from the Insert menu:

Now, you’ll see the drawing editor.

When creating a drawing for a document, the shapes menu can be particularly helpful. From thought bubbles to arrows to a smiley-face, this menu can help you whip up something playful or professional in no time.

As with images, you can resize a drawing and even mark it as inline or fixed within your document.
 You can also copy an existing Google drawing into a document. To do that, first select the relevant shapes in your original drawing, and then copy them using the Web clipboard.
In your document, open the Web clipboard and paste the drawing into your document.

Give it a test drive and let us know what you think in the comments.
Langganan:
Komentar (Atom)